
A common request when building a website is the ability to upload and manipulate files. ColdFusion offers a number of tags and functionality that allow you to control the files on the file system . The functionality offered ranges from the more simple process of creating a new file all the way up to manipulating a files meta data.
Let's take a look at the functionality in the order that you will probably use it.
Uploading Files
More often than not, the file that you wish to manipulate belongs to the users. For you to get the file onto the server they must first upload it via a form. The upload form used has no special attributes that are specific to ColdFusion; it just points to a ColdFusion page on the server.
To upload the file, you will need to use the cffile tag. The cffile tag offers a number of different actions that can be performed; most of these actions also have an equivalent function that can be used if you prefer cfscript format. However, the first action we are going to look at, upload, does not currently have a cfscript equivalent. For the sake of simplicity, this chapter will focus mostly on the functions, rather than the tags, as they are less verbose and can be used in tags or in cfscript calls.
When using cffile to upload a file, you will give it the action of upload by telling the tag to upload the file, then provide a destination. The destination is where you want the file to be uploaded to. You will provide the location of the folder on the server. Next, you will use the filefield attribute to specify the name of the form field that has the file in it. This will be the value of the name attribute in the input you created in the form that is of type file.
With these three attributes set, you can run the code and be able to upload a file. There are, however, some additional attributes that will be useful, and, in most cases, should be used. The first attribute to consider is the nameconflict attribute. When uploading a file, if there is already a file in the destination folder with the same name, an error will be thrown. Sometimes this might be a desirable outcome, but most of the time you will still want the file to upload. The nameconflict attribute accepts the following values:
- error: This is the default action and will throw an error stating that there is already a file with that name.
- makeunique: The most common action used and will append a number to the file name.
- overwrite: This action will overwrite the file on the server with the newer file.
- skip: This action will not put the file on the server, but will also not throw an error.
Another useful attribute of the cffile tag is the accept attribute. The accept attribute takes in a list of mime types that it will upload. For example, one mime type that could be placed in the accepts attribute could be 'image/jpeg'. If a file was uploaded that was not a JPEG image, such as a PDF, an error will be thrown. This attribute allows you to limit what gets put onto your server. This is very important as uploading files opens up a vulnerability to your server that some people could try to exploit. Only allowing specific file types will limit someone's ability to get an executable on your server.
The final attribute we are going to review is the result attribute. When a file is uploaded, a struct of data is created automatically. Inside that struct is a lot of useful information about the file, such as its file name, when it was uploaded, its file name on the server, the location of the file, etc. If you do not specify a value for the result attribute, then this struct will be stored in a variable called cffile. If a value is specified in the result attribute, then this value will be the name the struct is stored as.
If you were to use all the attributes mentioned above, your cffile tag might look something like this:
<cffile
    action="upload"
    destination="/Users/simon/Sites/aSite/files/"
    filefield="aFile"
    nameconflict="makeunique"
    accept="image/png"
    result="fileUploadResult" />
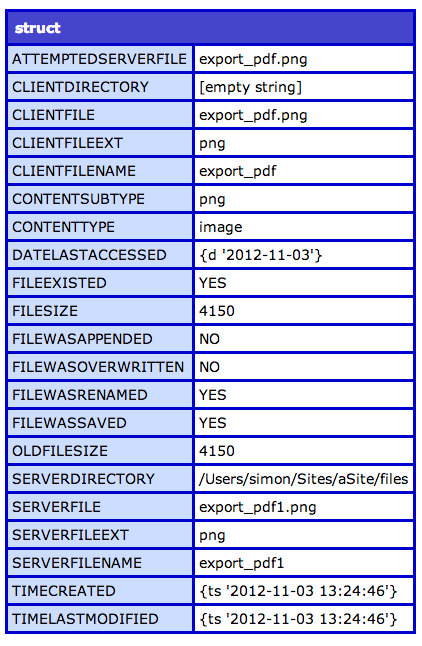
This would upload the file in the form called aFile to the /Users/simon/Sites/aSites/files/ folder only if it is a PNG image. If there was already a file with that name, it would make the filename unique and store its result into a variable called fileUploadResult. When dumped out, the fileUploadResult variable would looks something like this:
When uploading files, it is important to consider the security implications. If you allow users to upload any files and place those files within the web root, it is possible for the user to upload something malicious and run it. It is essential to take all available steps to stop this from being possible. In addition to the mime type check that the cffile tag can perform, you can also choose not to upload the file into the web root, but upload it to a location that is outside the web root and not accessible via the web. Once in this location, you can do some additional checks to confirm that the file is safe, and if you deem it to be safe, it can then be moved to its final destination.
ColdFusion makes this process easier by providing a temporary directory that can not be accessed via the web and is periodically purged of old files. Calling the function getTempDirectory will return the location of the temporary directory. You can then upload your file to this location, then use the result struct to get the file location and filename.
Another function which can be very useful when dealing with files and
folders is the expandpath function. In the example above, we provided a
hardcoded path to the folder we wished to upload it to. This path is
accurate, but only accurate on the machine we are currently developing
on. If this code were pushed to a production server, the chances are
that the file path will not stay the same. The exapndPath function
accepts a path from the current file location and generates the absolute
path for you. For example, if the code above were placed in the root
folder, we could have used #expandPath('files/')# rather than typing
out the exact path ourselves. Also, if the file that contained that line
of code were in a subfolder, we could have used expandPath as so:
#expandPath('../files/')#.
Manipulating Files
Once the file needed is accessible, either by uploading or it being pre-existing, we can then do some manipulation to it. If the file that you are manipulating is an image, not all of these functions will apply to you. ColdFusion offers a number of image specific functions which will be covered in the next section.
When dealing with file functions in ColdFusion, it requires either a file object or an absolute path. When you plan on doing multiple updates to a file, it is much easier to create a file object that can be passed to the different functions. If you do not use a file object, then the file will need to be read and written multiple times; as IO speeds can be slow sometimes, using the file object will increase the processing of the code. To create a file object, use the fileOpen function, which accepts the absolute path of the file. It has an optional argument called mode. This mode is what action you plan on performing on the file, such as read, write, or append. If you do not specify the mode, ColdFusion defaults to read. If you are in read mode, you will not be able to write any data to the file using this file object. Once you have the file object, you will have access to a struct of data pertaining to the file, such as file name, lastmodified and so on.
The fileRead function is how you read in data to a variable. The
function accepts either an absolute file path or a file object. The
contents of the file will then be returned and can be saved in a
variable It is important to note that for large files, this process
could take a while to run, and as the variable is in the memory, it is
possible that you will see issues with your server if it contains large
amounts of data in memory.
If you plan on reading and manipulating a large file, you might want to
consider the fileReadLine function. This function will read in a line at
a time; since you are only dealing with one line at a time you will not
fill up the server's memory with the file contents. Also, as you are
only loading up one line, your code will most likely run faster.
To read in a file one line at a time, you will need to call a function
called FileisEOF. This function accepts the file object and will tell a
loop if it has read all the lines in the file or not. Here is an example
of these two functions at work:
while( !FileisEOF( afile ) ) {
    line = FileReadLine( afile );
    WriteDump( line );
}
It is important to remember that when calling the fileOpen function, it
is like opening the file with an application. While that file is open
with ColdFusion, other applications will not be able to access the file.
All files that are opened need to be closed. To do that, use the
fileClose function and pass it in the file object. If you do not close
the file, the file system will see it as still in use and will continue
to lock the file. If fileClose is not called, it is possible that the
file will remain locked until the server is restarted.
The next function we will discuss is the fileWrite function. The
fileWrite function allows you to write data to a file. The function
accepts a file path or a file object and a string of data. When writing
data to a file, if the file does not exist, then the file will be
created. If the file already exists, the data will be overwritten by the
new data. If you do not wish to overwrite the data, first check if the
file exists. To do that, call the fileExists function and pass it in the
path to the file. If the file exists, then it will return true, else it
will return false.
If at any point you want to delete a file, call the fileDelete function
and pass in an absolute path to the file.
cfdirectory
As well as needing to manipulate files, it is sometimes necessary to manipulate directories. Just like with files, there is one main tag that can be used for a number of functions. And, just like with files, there is one important action that does not have a script equivalent.
The tag in question is the cfdirectory tag. This tag has a number of actions available to it; for now, we are going to focus on the list action. The list action will return all the files and directories that are located in the provided directory. The directory attribute specifies which directory to list the contents of. In addition to the action and the directory attributes, a name attribute is also required; this specifies the name of the variable which will be created with the resulting data. The resulting data from this tag is a query. In this query are a number of columns of information and one row per file in the directory. The data returned in the query is:
- name: The file or directory name
- directory: The directory path
- size: The file size
- type: If it is a file or a directory
- dateLastModified: When the directory or file was last updated
- attributes: The file attributes if there are any
Sometimes you might only be concerned about a certain type of file that is in a folder. If that is the case, the filter attribute can be used to filter the data that is returned based on file extension. If you only wanted to return PNG images, you could give the filter attribute the value of '*.png' and only PNG images would be returned.
Here is an example of a cfdirectory call that will list out all PNG images and place them in the qImages variable:
<cfdirectory
    action="list"
    directory="#expandpath('images/')#"
    name="qImages"
    filter="*.png" />
In addition to listing out the contents of a directory, the cfdirectory tag also allows you to create, delete, copy, and rename directories. These actions also have equivalent functions that can be called from cfscript.