
A great feature set of ColdFusion is its image functionality. ColdFusion has the ability to easily manipulate images, create new images, draw images, and write them back to the file system. All this functionality comes right out of the box with ColdFusion without need of any extra plugins or installs.
There are so many pieces of image related functionality that it is not feasible to explain all of them in this section. For the purpose of this section, we will review a few of the more common functions used. To see a full list of image functionality available, go to: https://helpx.adobe.com/coldfusion/cfml-reference/coldfusion-functions/functions-by-category/image-functions.html.
Reading in an Image
Before you start manipulating an image, the first thing is to read the
image into memory by calling the ImageRead function. The ImageRead
function accepts one argument as the path to the image. The argument can
either be a path to an images location on your server, the path to an
image in the virtual file system, or a URL to the image located on a
different server. If you want to manipulate an image provided by the
user, the image must be already uploaded to the server, which was
discussed in the previous section.
The ImageRead function returns an image object which can then be stored
in a variable. This image object will be needed for the other image
functions. Once you have this image object, you can start to manipulate
the image.
Scaling and Cropping an Image
The most used image functions are the functions that will resize and crop images. This functionality will allow you to reduce the size of an image so that it will display better on your web site. Rather than resizing an image using the img tag on your web site and scaling it down, the best course of action is to resize the image programmatically.
The best function to use when resizing an image is the ImageScaleToFit
function. This function accepts a number of arguments, the first being
the image object of which the action will be performed on; the ensuing
options are the desired width followed by the desired height. When run,
the function will proportionally resize the image so that it is no wider
than the specified width and no taller than the specified height.
As an option, the function also accepts values for interpolation and blur factor. The interpolation value controls the quality of the image created. There is a list of a number of algorithms available which can be found in the documentation. The blur factor value specifies how much blur to add to the image. The value is between one and ten, where ten is the blurriest.
Below is an example of an image object being scaled to a 150px by 200px area.
ImageScaleToFit(imageObj,150,200);
If, when scaling an image, your concern is fitting the image into one of the proportions, such as width, then you can opt to pass in an empty string into the other value, as ColdFusion will only scale the image for the specified value. For example, if you only wanted to scale the image to fit into a 100px wide area, you could use the following code:
ImageScaleToFit(imageObj,100,'');
In some situations, it might be necessary to crop an image so that it
fits the desired output area. To do this, you will use the ImageCrop
function. The ImageCrop function accepts a number of arguments, all
which are required. Along with the image object, you will need to pass
in the height and width of the cropped image you are generating as well
as the x and y coordinates of where the cropping should begin. For
example, if you ran the code sample below, you would generate an image
that is 200px high and 150px wide. It was cropped from the image
contained in imageObj, and the cropping started 10px from the top and
20px from the left.
ImageCrop(imageObj,20,10,150,200);
Getting Image Information
At some point in your image manipulation process, you may need to gather certain information about the image, such as width and height. Perhaps you will be using it for logic decisions, or possibly you wish to store it in the database along with a record of the image. Whatever the reason, ColdFusion makes it very simple to do.
The ImageInfo function accepts an image object and returns a struct
containing information about the image. In addition to outputting the
usually expected information like width and height, it also provides
additional information about the image, such as transparency and color
space. Here is an example of the information returned when doing
ImageInfo on the Google logo:
![]()
Optionally, if you just care about the image dimensions, you can call
the ImageGetWidth and ImageGetHeight functions, passing in your image
object, to get the width and height values of your image.
Creating Image
In the above examples, we have assumed that the image being manipulated is an image that already exists. However, with ColdFusion you can create a new image and manipulate this new image.
To create a new image, you would call the ImageNew function. This
function returns an image object. ImageNew has no required arguments; if
no arguments are passed, a blank image object will be created and
additional functions will need to be called to set its width, height,
etc. ImageNew does have a number of optional arguments which are
explained below.
- source: The source argument is another image. It can be another image object, a file path, or a URL. If the source argument is used, then the width and height will automatically be set to the dimensions of this image. It cannot be overridden in this function call, but can be changed later. Using the source argument is similar to copying the image, as this will make an entirely new image.
- width: Sets the width of the image, if the source argument has not been provided.
- height: Sets the height of the image, if the source argument has not been provided.
- imageType: This argument allows you to specify the type of image you are creating. You are able to create RBG, ARBG, and grayscale images.
- canvasColor: The background color for the image. This argument accepts a hexidecimal value (such as FFFFFF), a string value (such as Blue), or a list of 3 RGB numbers.
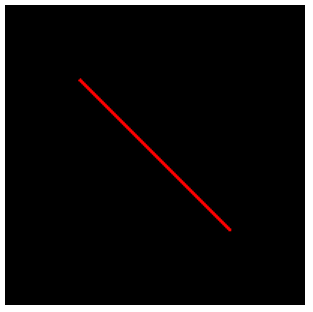
Drawing on an Image
When you have your image object, either via loading in an image or creating a new image, you have the ability to draw on the image. Using the drawing functionality is slightly different than the previous functions you have encountered. Most of the other functions you have reviewed so far have always encapsulated all their data. Other settings that you can control do not affect the output of those functions; when it comes to image functions, that is not the case.
When thinking of the image functions, think of them as if you were using your favorite design software. When you are drawing a line on the page, you would first select the color, then the line thickness, then you would draw the line from point A to point B. That is how it is when using the image functions. Rather than calling a function to draw a line and passing in the line color, the line thickness, and the x and y coordinates of point A and point B, you will set the basic information first, then call the functionality to draw the line.
For example, say you wanted to draw a red line that is 2px thick. The
first thing to do is call the ImageSetDrawingColor function, and pass in
the image object and the color red. Then you would call the
ImageSetDrawingStroke function and pass in the image object and a struct
containing our stroke properties. Once that is done, then call the
ImageDrawLine function and pass it in the image object, the x and y
coordinates of our start point, and the x and y coordinates of our end
point, which will then draw the line.
The advantage of calling ImageSetDrawingColor and ImageSetDrawingStrike
is that once we draw the first line, we can draw multiple ones and they
will all have the same color and stroke styles. If we ever need to
change the color, we simply call the ImageSetDrawingColor function with
the new color, then draw the next line.
Here is the code for the example discussed above:
imageObj = ImageNew('','200','200','rgb');
ImageSetDrawingColor(imageObj,'Red');
ImageSetDrawingStroke(imageObj,{width=2});
ImageDrawLine(imageObj,50,50,150,150);
And here is the image generated:
Writing Images
Once you have finished manipulating your image, the next thing is to
write the image. To write an image to the file system, you will use the
ImageWrite function. If the image object you are trying to write was
created by reading in an image from the file system, you can call the
ImageWrite function and only pass in the image object; it will overwrite
the old image with this new one. If you created the image by calling
ImageNew or if you do not wish to overwrite the original image, you can
also pass in a destination, which is an absolute file path, and a file
name of where to save the image. Additionally, ImageWrite has two option
arguments that can be passed. The first is if the image should overwrite
another image if it already exists; the second is the quality that
should be used when encoding the image. The available quality values
range from 0 to 1 and only apply to JPG and JPEG images.
Outputting Images
During the development process, it can be cumbersome to constantly be writing files to the file system, opening them up in an image editor, and checking if they are correct or not. To speed up the process for development, you can use the cfimage tag and provide an action of writetobrowser. In addition to the action, you provide a source attribute and pass in the image object. The cfimage tag will then output the image to the browser for you rather than having to constantly write it to the file system. Here is an example:
<cfimage action="writeToBrowser" source="#imageObj#" />